Tutorial 1: Introduction to Salesforce

In this Salesforce tutorial for beginners, you will learn Salesforce from scratch. This tutorial will guide you through the foundational elements of Salesforce architecture, exploring its core components and functionalities.

In this tutorial, we will discuss the following topics:

  • What is Salesforce?
  • History of Salesforce
  • Why Should We Learn Salesforce?
  • Salesforce CRM
  • What is SFDC?
  • Salesforce Benefits
  • Features of Salesforce
  • Salesforce Products
  • How Do We Access Salesforce?
  • Why Should We Choose Salesforce?
  • Why is Salesforce Gaining Popularity?
  • Differences Between Salesforce CRM and Dynamic CRM
  • Cloud Computing
  • Differences Between the Services and Components Managed by IaaS, PaaS, and SaaS
  • Problems with Traditional Software Methodology (Legacy Platforms)

What is Salesforce?

Salesforce is a leading cloud-based Customer Relationship Management (CRM) platform designed to help businesses manage customer information, interactions, and processes more effectively. It serves as a central platform for various business functions, including sales, customer service, marketing, and more, enabling organizations to streamline their operations and enhance communication across teams.

Tutorial 1: Introduction to Salesforce

Salesforce as a Cloud-Based Platform

As a cloud-based platform, Salesforce provides businesses with the flexibility and accessibility to manage and analyze customer activities and data from anywhere in the world. This means that teams can collaborate in real-time, regardless of their physical location.

The platform’s cloud nature ensures businesses can scale their operations efficiently without requiring extensive hardware installations or maintenance, leading to lower IT costs and higher adaptability.

Salesforce’s cloud infrastructure also offers robust security features, ensuring sensitive customer data is securely managed and compliant with industry standards.

History of Salesforce

Salesforce was founded in 1999 by Marc Benioff, Parker Harris, Dave Moellenhoff, and Frank Dominguez as a company specializing in software as a service (SaaS). It started with the vision of making software easier to purchase, simpler to use, and more democratic without the complexities of installation, maintenance, and constant upgrades.

Salesforce introduced its new flagship product, Salesforce Automation (SFA). It revolutionized how companies managed customer relationships and sales processes, moving from the traditional client-server model to a centralized, web-based service.

Milestones and Innovations

Over the years, Salesforce has expanded its product line and introduced significant innovations that have shaped the CRM industry.

Key milestones include:

  • 2004: Salesforce went public on the New York Stock Exchange under the CRM ticker, raising significant capital to fuel its growth.
  • 2006: The AppExchange, a marketplace for third-party applications that integrate with Salesforce, was introduced, marking a pivotal step in creating a comprehensive ecosystem around its products.
  • 2011: Salesforce Chatter was launched, enhancing productivity and collaboration among users with features like social networking and instant messaging integrated within their CRM environment.
  • 2013: The release of Salesforce1, a mobile-initiative app, reflecting Salesforce’s commitment to mobile CRM solutions.
  • 2014: The Salesforce Customer Success Platform was announced, an integrated solution that combined Salesforce’s analytics, community, service, sales, marketing, and app-building capabilities.
  • 2016: Salesforce introduced Einstein, an AI layer built into the Salesforce platform, providing AI capabilities across all Salesforce clouds and enhancing data insights and decision-making processes.
  • 2019: Acquisition of Tableau, a significant move to expand Salesforce’s data visualization and business intelligence capabilities.
  • 2020: Salesforce was ranked #1 in CRM for the seventh consecutive year by IDC and expanded its pandemic response with the launch of Salesforce Care, Work.com, and Vaccine Cloud. It was added to the Dow Jones Industrial Average, acquired Vlocity, and announced plans to acquire Slack. It also hosted a virtual Dreamforce with over 140 million views.
  • 2021: Salesforce completed its acquisition of Slack, promoting a new vision for a Slack-driven Digital HQ, introduced Salesforce+, achieved Net Zero emissions, sourced 100% renewable energy, and committed to new Equality initiatives and police reform.
  • 2022: Salesforce announced the Customer Data Cloud at its 20th Dreamforce, launched the Safety Cloud and NFT Cloud, and was recognized as the Most Sustainable Company and World’s Best Workplace, reinforcing its commitment to sustainability and excellence.
  • 2023: Salesforce’s Einstein made over 1 trillion AI-powered predictions weekly, and the company launched Einstein GPT, the Einstein 1 Platform, and Einstein Copilot. Salesforce Ventures also announced a $500 million generative AI fund, and the company continued its significant philanthropic efforts through the 1-1-1 model.

Why Should We Learn Salesforce?

Career Opportunities

Learning Salesforce opens up many career opportunities in various sectors due to its widespread adoption across industries. As the leading CRM platform globally, Salesforce expertise is highly valued in job markets, with roles ranging from Salesforce administrators and developers to project managers and IT consultants.

Professionals skilled in Salesforce can expect competitive salaries and strong demand for their skills as companies continue to enhance their customer relationship management systems.

Salesforce offers a robust certification program that helps further validate your skills and can significantly enhance your employability and career progression.

Industry Adoption and Ecosystem

Salesforce is widely adopted across industries ranging from technology and healthcare to finance and manufacturing. Still, it also boasts a vast ecosystem that includes third-party apps, consultants, and developers.

This ecosystem continually evolves, fueled by constant innovation and integration that keep the platform at the cutting edge of technology and business needs. The widespread adoption is also a testament to the platform’s scalability and flexibility, accommodating businesses of all sizes and varying requirements.

This pervasive use creates a dynamic market for Salesforce solutions and a community of users and developers, contributing to a vibrant support network and an extensive resource pool of knowledge and tools. Learning Salesforce provides technical skills and access to a thriving network and community, enhancing professional growth and networking opportunities.

Salesforce CRM

Core Components of Salesforce CRM

Salesforce CRM is built on several core components that provide a comprehensive toolset for managing customer relationships effectively.

These include:

How Salesforce CRM Stands Out

Salesforce CRM distinguishes itself in the competitive CRM market through several key aspects:

1. Customer 360

It is an integrated CRM platform that connects Salesforce products, giving a unified customer view across sales, customer service, marketing, and more. This integration ensures that all teams access the same data, providing a consistent and informed customer experience across all touchpoints.

2. Scalability and Flexibility

Salesforce’s cloud-based structure allows businesses of any size to scale up or down based on their needs without significant upfront costs. The platform’s extensive customization capabilities through declarative and programmatic tools allow it to adapt to specific business requirements.

3. Ecosystem and Marketplace

Salesforce’s AppExchange marketplace features thousands of third-party applications that extend the functionality of Salesforce CRM in countless ways. This vibrant ecosystem also includes a global community of developers, administrators, and consultants who continuously drive innovation and share best practices.

4. Continuous Innovation

Salesforce is known for its rapid innovation cycles. It regularly introduces new features and technologies that keep the platform at the forefront of CRM and technology trends like artificial intelligence, machine learning, and blockchain.

5. Commitment to Social Responsibility

Beyond its technical capabilities, Salesforce is also recognized for its commitment to social issues, emphasizing trust, customer success, innovation, and equality as core values that drive its corporate decisions and culture.

These features make Salesforce CRM a powerful tool for managing customer relationships and a dynamic platform that pushes the boundaries of what CRM software can achieve.

What is SFDC?

SFDC stands for Salesforce.com, the original domain and current company name that hosts the Salesforce platform. SFDC is a cloud-based CRM software and enterprise cloud ecosystem that helps businesses manage customer relationships, streamline processes, and improve profitability in a scalable, customizable platform.

It offers comprehensive services, including sales management, customer service, marketing automation, and business analytics, all accessible online. This setup allows users to work efficiently without needing to install local software, offering global accessibility and real-time collaboration capabilities.

Relation Between SFDC and Salesforce

SFDC and Salesforce are essentially two terms referring to the same entity. SFDC is the platform, while “Salesforce” is the company that provides the platform.

However, in common usage, Salesforce refers to the entire range of products and services offered by Salesforce.com, Inc., which extends beyond the basic CRM functionalities to include a broad suite of enterprise applications focused on customer service, marketing automation, analytics, and application development connected through a single, integrated cloud computing platform.

This platform allows developers to create and deploy custom applications that leverage SFDC’s core functionalities, making Salesforce synonymous with innovative cloud solutions beyond traditional CRM services.

Why SFDC?

Benefits Over Traditional CRM Systems

SFDC (Salesforce.com) offers numerous advantages over traditional CRM systems, primarily due to its cloud-based architecture. This modern approach eliminates the need for substantial initial hardware investments and complex software maintenance, typical requirements of traditional on-premise CRM systems.

With SFDC, updates are automatic and frequent, ensuring all users can access the latest features and security enhancements without downtime or additional costs.

The cloud-based system allows for greater scalability and flexibility, enabling businesses to adjust their usage based on growth and changing needs without significant disruptions or infrastructure changes.

Specific Advantages of SFDC

  • Accessibility: SFDC provides access to the CRM system from anywhere with an internet connection, facilitating remote work and real-time data access for a globally distributed workforce.
  • Integration Capabilities: With its extensive API and a large ecosystem of integration partners, SFDC can be seamlessly integrated with various other software and platforms, enhancing its functionality and allowing for a more connected enterprise system.
  • Customization and Scalability: SFDC’s platform is highly customizable, allowing businesses to tailor the CRM to fit their specific processes and needs. As a business grows, Salesforce can scale alongside it, making adjustments easily without significant cost.
  • Robust Security: Leveraging enterprise-grade security features, SFDC protects sensitive data and complies with a range of international regulatory standards, giving businesses confidence in the integrity and security of their data.

Traditional CRM Vs. Salesforce CRM

Key Differences in Functionality

  • Deployment: Traditional CRMs are often deployed on-premise, requiring physical servers and ongoing maintenance by the company’s IT staff. In contrast, Salesforce CRM is entirely cloud-based, with all infrastructure managed by Salesforce, reducing the IT burden on the company.
  • Custom Development: While traditional CRMs can be customized, they often require extensive coding and are limited by the underlying platform capabilities. Salesforce CRM offers a more flexible environment with its own development language (Apex) and platform (com), designed for rapid development and customization.

Comparison of User Experience

  • User Interface: Salesforce CRM provides a modern, intuitive user interface that is continuously updated to reflect new trends and user feedback. Traditional CRM systems may have less frequent updates and can appear outdated, potentially leading to a steeper learning curve and lower user adoption rates.
  • Mobile Experience: Salesforce CRM emphasizes mobile access, providing a robust mobile app allowing users to do nearly everything they can on a desktop. Traditional CRMs may offer limited mobile features, impacting the productivity of on-the-go employees.
  • Collaboration Tools: Salesforce integrates various communication and collaboration tools, such as Salesforce Chatter, which enables users to collaborate seamlessly within the platform. Traditional CRMs might require third-party tools for similar functionality, complicating the user experience.

Salesforce Benefits

1. Comprehensive Solution

Salesforce provides a solution that covers sales, customer service, marketing, community management, analytics, and more, all within a single platform. This comprehensive coverage ensures that businesses can effectively manage all aspects of their customer relationships, from lead acquisition to ongoing engagement and support.

2. Cloud-Based Data Storage

Utilizing cloud-based data storage, Salesforce enables businesses to store vast data securely online. This approach enhances data security and compliance and allows users to access this data from anywhere in the world, facilitating remote work and real-time decision-making.

3. Versatility for All Business Sizes

Salesforce is designed to be flexible, catering to the needs of small businesses, mid-sized companies, and large enterprises alike. Its scalability and extensive range of products ensure that businesses of any size can tailor the platform to their specific requirements.

4. Pay-as-You-Go Service Model

Salesforce’s pay-as-you-go model makes it financially accessible for businesses of all sizes. Companies can start with what they need and expand services as their business grows, which helps them manage costs effectively without significant upfront investments.

5. Boosted Sales Productivity and Customer Loyalty

Salesforce automates many routine sales and customer management tasks, allowing sales teams to focus more on closing deals and less on managing data. The platform’s customer service tools also help improve customer satisfaction, boosting loyalty and retention.

6. Easy Integration with Third-party Apps

One of Salesforce’s strengths is its ability to seamlessly integrate with a wide range of third-party applications through its extensive API and partnerships. This flexibility allows businesses to connect Salesforce with other systems, creating a unified workflow and data system.

7. Scalability

Salesforce scales effortlessly with your business growth. Whether you’re adding new users, increasing data storage, or integrating new functionalities, Salesforce can accommodate this growth without redesigning the underlying systems.

8. Customization

With its powerful customization capabilities, Salesforce allows businesses to modify workflows, dashboards, and interfaces to meet their specific operational needs. Salesforce’s platform also supports custom app development, enabling companies to create unique solutions tailored to their business processes.

9. Community and Support

Salesforce boasts a robust community of users, developers, and partners known as the Trailblazer Community. This community is a valuable resource for support, learning, and networking. Salesforce provides extensive customer support and professional services to ensure users can maximize the value of their investment in the platform.

Features of Salesforce

1. Cloud-Based Advantage

Salesforce leverages cloud technology to offer businesses a reliable and scalable CRM solution without the typical overhead associated with physical servers and IT maintenance. This cloud-based advantage ensures users can access Salesforce from any device with an internet connection, providing flexibility and enhancing team collaboration.

2. Comprehensive CRM Features

Salesforce delivers a full spectrum of CRM functionalities, including sales management, customer service, marketing automation, and detailed analytics. This comprehensive approach ensures that all customer relations are managed in a unified platform, streamlining processes and improving data accuracy.

3. Integration Capabilities

The platform excels in integrating seamlessly with many other software systems and tools, whether through native integrations, APIs, or the AppExchange marketplace. This allows businesses to maintain a cohesive technology ecosystem that enhances productivity and data consistency.

4. Contact Management

Salesforce provides robust contact management capabilities that allow businesses to store, track, and manage contact details and customer interaction histories. This feature ensures teams have the context for personalized customer interactions and relationship building.

5. Marketing and Sales Lead

The platform supports advanced marketing and sales lead management tools that help businesses track the efficiency of their marketing campaigns and follow leads from generation to conversion. These tools are designed to optimize marketing strategies and boost sales performance.

6. Build and Run Innovative Apps

With Salesforce’s Platform, businesses can build and run custom applications directly within the Salesforce ecosystem. This flexibility allows companies to develop apps perfectly tailored to their specific needs, enhancing functionality without compromising security or performance.

7. Salesforce Analytics

Through comprehensive data analysis tools, Salesforce Analytics provides deep insights into business operations and customer behaviors. These tools help companies make informed decisions based on real-time data, leading to better business outcomes.

8. Sales Community

The Sales Community feature enables companies to connect their sales teams with other departments and external partners, facilitating collaboration and information sharing. This community-driven approach helps streamline processes and ensures all stakeholders are aligned on objectives.

9. Salesforce Engine

The Salesforce Engine is a powerful automation tool that drives the platform’s workflows, processes, and rules. It is designed to increase efficiency by automating routine tasks and orchestrating complex business processes.

10. Lead Management

Salesforce’s lead management system helps businesses track and nurture leads through customized paths, improving conversion rates and maximizing sales opportunities. It includes tools for scoring, tracking, and prioritizing leads to ensure that sales teams focus their efforts where they are most likely to yield results.

11. Partnership Management

Salesforce also offers tools to manage partnerships effectively, allowing businesses to track joint sales, manage leads shared between partners, and collaborate on marketing initiatives.

Salesforce Products

Overview of Salesforce Cloud Solutions

Introduction to Platform Solutions

How Do We Access Salesforce?

Accessing Salesforce Online

Salesforce can be accessed online through any web browser, providing users flexibility and ease of use.

To start using Salesforce, follow these steps:

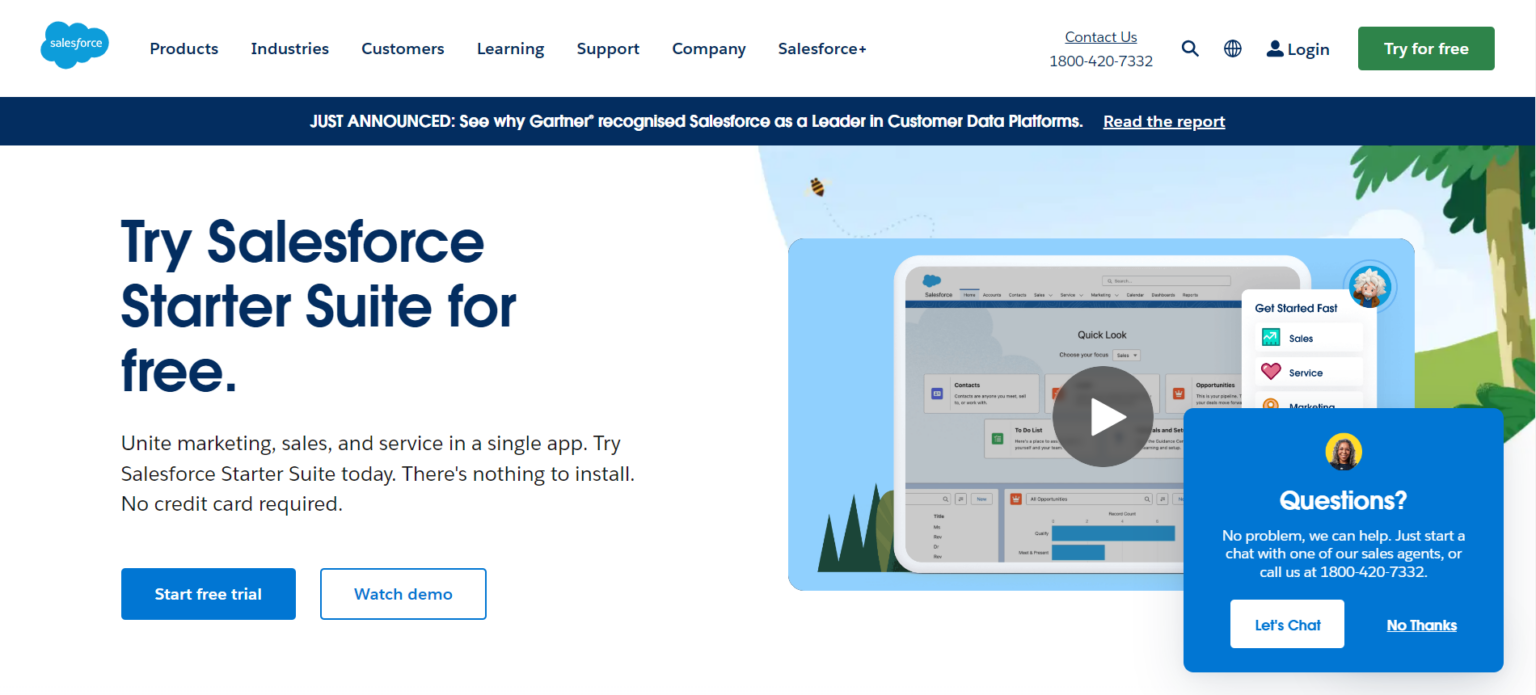
  1. Visit the Salesforce Website: Go to the official Salesforce website (www.salesforce.com) and click on the ‘Login’ button located at the top right corner of the home page.
  2. Enter Your Credentials: If you already have an account, enter your login credentials (username and password) and hit ‘Log in.’ If you do not have an account, you can sign up for one by clicking on ‘Try for Free’ to create a new Salesforce trial account.
  3. Navigate the Interface: Once logged in, you will be directed to your Salesforce dashboard. Here, you can access various modules and data, customize your dashboard, and start working with the CRM tools available according to your role and permissions.

Salesforce also provides robust security features, ensuring all data is securely accessed and managed. Users can set up multi-factor authentication and other security measures to protect their accounts and sensitive business information.

Salesforce Mobile App

For on-the-go access, Salesforce offers a mobile app that brings the power of the Salesforce platform to your mobile device. The Salesforce Mobile App is available for download on Android and iOS devices and provides many of the same functionalities as the desktop version.

Here’s how you can get started:

  1. Download the App: Search for the Salesforce Mobile App in the Google Play Store or Apple App Store, and download it onto your mobile device.
  2. Log in to Your Account: Open the app and log in with the same credentials you use to access the online platform.
  3. Navigate Your CRM on the Go: The mobile app provides a user-friendly interface tailored for smaller screens. It allows you to manage leads, check dashboards, update opportunities, and communicate with your team members, all from your smartphone or tablet.

The Salesforce Mobile App ensures that users can stay connected and productive even when away from their desks. The app syncs data in real-time, so you always have access to the most up-to-date information, ensuring seamless workflow continuity regardless of your location.

Why Should We Choose Salesforce?

1. Business Benefits

Choosing Salesforce provides many business benefits, enabling organizations to enhance their customer relationship management, streamline processes, and boost overall productivity.

Salesforce’s comprehensive CRM solutions help businesses cultivate deeper relationships with customers, better understand their needs, and deliver exceptional service, ultimately leading to increased customer satisfaction and loyalty.

2. Technological Edge

Salesforce is at the forefront of CRM technology, continually evolving with the latest advancements. It incorporates cutting-edge features like artificial intelligence (AI) through Salesforce Einstein, as well as advanced analytics capabilities, offering businesses the tools they need to stay competitive in a rapidly changing digital landscape.

3. Cloud-based Accessibility

The cloud-based nature of Salesforce allows users to access the platform from anywhere, at any time, using any device with internet connectivity. This flexibility is important for businesses with remote teams or those requiring access to real-time data outside of traditional office settings.

4. Affordability

Salesforce offers a range of pricing plans that cater to businesses of all sizes, from small startups to large enterprises. The pay-as-you-go model ensures that companies only pay for what they use, which helps in managing costs effectively while still benefiting from a robust CRM platform.

5. Versatile Capabilities

Whether it’s sales, marketing, service, or IT needs, Salesforce provides versatile capabilities to manage various aspects of business operations. This versatility allows companies to adapt the platform to their specific processes and workflows, creating a tailored experience that maximizes efficiency.

6. Simplified Setup

Salesforce is designed for ease of use, with a setup process that is straightforward and user-friendly. Organizations can quickly deploy Salesforce without the lengthy and complex implementation phases typically associated with traditional CRM systems.

7. No Software Installation

Being a cloud-based platform, Salesforce does not require any software installation. This simplifies the IT infrastructure and eliminates the need for ongoing software maintenance and updates, reducing the IT burden on staff.

8. Seamless Integration

Salesforce boasts extensive integration capabilities, connecting smoothly with other systems and applications through APIs and a robust marketplace of apps (AppExchange). This seamless integration extends the functionality of Salesforce, allowing businesses to create a fully integrated IT ecosystem.

9. User-friendly Interface

The Salesforce interface is designed with the user in mind, ensuring that it is intuitive and easy to navigate. This user-friendly design helps reduce the learning curve and allows users to become proficient quickly, enhancing productivity.

10. Cost Reduction

By automating and optimizing business processes, Salesforce helps reduce operational costs. Its analytics and reporting tools also allow businesses to make data-driven decisions that can lead to cost savings and improved resource allocation.

Why is Salesforce Gaining Popularity?

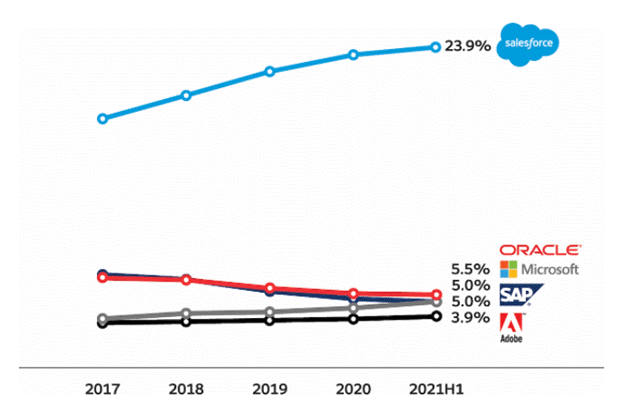
The below graph displays the market share trend for several major CRM companies from 2017 through the first half of 2021. Salesforce shows a notable upward trajectory, with its market share increasing consistently year over year, reaching 23.9% by the first half of 2021.

The data highlights Salesforce’s growing dominance and increasing preference in the CRM market relative to its competitors.

Tutorial 1: Introduction to Salesforce

Market Trends

Salesforce has been aligning with major market trends emphasizing digital transformation, customer experience, and cloud computing. These trends have accelerated the adoption of CRM solutions that offer robust, cloud-based functionalities capable of managing vast amounts of data and customer interactions across multiple channels.

Salesforce’s leading position in the CRM market is reinforced by its continuous innovation and ability to integrate emerging technologies such as AI and IoT into its platform.

Reasons Why Salesforce is Gaining So Much Popularity

  • Scalability and Customization: Allows businesses to expand and tailor their CRM to meet evolving needs, enhancing productivity and user experience.
  • Multi-tenant Architecture: Ensures seamless, automatic updates and efficient resource use, reducing operational costs.
  • Partner Ecosystem: Features a diverse network of partners, expanding capabilities with numerous third-party integrations.
  • Data Security: Provides robust security across the platform, supported by comprehensive compliance certifications.
  • Continuous Enhancement: Stays ahead of industry trends with regular updates and innovations, addressing new business challenges effectively.

Differences Between Salesforce CRM and Dynamic CRM

Platform Comparison

Salesforce CRM and Microsoft Dynamics CRM are two of the leading platforms in the CRM market, each with distinct strengths and focus areas:

1. Deployment Options

Salesforce primarily offers a cloud-based deployment, ensuring users have access to the platform and data anywhere and anytime. Microsoft Dynamics CRM provides more flexibility with cloud, on-premise, and hybrid deployment options, catering to businesses with specific data handling or regulatory requirements.

2. Customization and Flexibility

Salesforce stands out for its high degree of customization and an extensive app ecosystem through its AppExchange. Dynamics CRM also offers strong customization capabilities but is often noted for its native integration with other Microsoft products like Office 365 and Outlook.

3. User Interface and Usability

Salesforce features a user-friendly interface that is highly intuitive and easy to navigate, which can enhance productivity. Dynamics CRM integrates deeply with other Microsoft tools, offering a familiar interface for users already accustomed to the Microsoft environment.

4. Pricing Structure

Salesforce generally adopts a subscription-based pricing model that can scale with the features and number of users. Dynamics CRM may offer more flexible pricing options, which is especially attractive for companies looking for on-premise deployments or those already using multiple Microsoft products.

Use Case Scenarios

Both Salesforce and Dynamics CRM serve broad markets, but their features may cater to specific business needs differently:

  • Enterprise vs. SMB: Salesforce is a strong fit for enterprises and SMBs alike, particularly excelling in scenarios where innovation and scalability in the cloud are priorities. Dynamics CRM is often favored by organizations that are heavily invested in Microsoft technologies and seeking deep integration with them.
  • Industry Solutions: Salesforce offers solutions tailored to various industries, including healthcare, finance, manufacturing, and more, with specialized products like Health Cloud. Dynamics CRM provides strong offerings for government, retail, and manufacturing sectors, leveraging Microsoft’s enterprise technology stack.
  • Sales and Marketing: With robust analytics and marketing tools, salesforce shines in managing customer relationships across the entire customer lifecycle, from lead to loyalty. Dynamics CRM offers strong sales capabilities with advanced reporting features, benefiting from tight integration with Microsoft Power BI.

Cloud Computing

Types of Cloud Services

1. Infrastructure-as-a-Service (IaaS)

IaaS provides fundamental computing, network, and storage resources on demand, over the Internet, and on a pay-as-you-go basis. Users have control over their virtual networking environment, including choice of operating system, development platform, and data hosting.

Examples include Amazon Web Services (AWS), Google Cloud Platform (GCP), and Microsoft Azure.

2. Software-as-a-Service (SaaS)

SaaS delivers software applications over the Internet on a subscription basis. The service provider centrally hosts and manages the service. SaaS eliminates the need for organizations to install and run applications on individual computers or in their own data centers.

Examples include Salesforce, Microsoft Office 365, and Google Workspace.

3. Platform-as-a-Service (PaaS)

PaaS allows customers to develop, run, and manage applications without the complexity of building and maintaining the infrastructure typically associated with developing and launching an app. PaaS can be used for general software development, and services may include hosting, database management, security, and scalability.

Examples include Heroku, Google App Engine, and Microsoft Azure App Services.

4. Basics of Cloud Computing

Cloud computing delivers different services through the Internet, including data storage, servers, databases, networking, and software. Cloud-based storage makes it possible to save files to a remote database and retrieve them on demand.

The services are highly flexible, giving organizations the opportunity to scale up as their computing needs increase and scale down as demand decreases.

Importance in Today’s Technology Landscape

Cloud computing has become critical in today’s technology landscape because it enables flexibility, global scale, and faster innovation.

It allows businesses to:

  • Reduce IT Costs: Moving to cloud computing may reduce the cost of managing and maintaining IT systems.
  • Scalability: Cloud environments allow enterprises to operate more efficiently and adjust their resource use in response to demand.
  • Accessibility and Collaboration: Since data is stored in the cloud, it can be accessed from any device in any part of the world. Teams in different locations can collaborate on projects without needing to duplicate files.
  • Disaster Recovery: Cloud computing can also enhance data security for its users by backing up data off-site, decreasing the potential for data loss.

Differences Between the Services and Components Managed by IaaS, PaaS, and SaaS

Service Model Comparison

1. Infrastructure-as-a-Service (IaaS)

This model provides virtualized physical computing resources over the Internet. IaaS offers businesses the highest level of flexibility and management control over their IT resources. It is typically used for data storage, virtualization, networks, and servers.

    • Key Components: Virtual machines, storage, networks, and servers.
    • Common Uses: Hosting websites, data storage, backup, and web apps.

2. Platform-as-a-Service (PaaS)

PaaS provides a framework for developers to build upon and use to create customized applications. The enterprise can manage all servers, storage, and networking or a third-party provider, while the developers can maintain application management.

    • Key Components: Development tools, database management systems, and business analytics.
    • Common Uses: Application development, business analytics, and business process management.

3. Software-as-a-Service (SaaS)

SaaS provides a complete software solution you purchase on a pay-as-you-go basis from a cloud service provider. You rent the use of an app for your organization, and your users connect to it over the Internet, usually with a web browser. The underlying infrastructure, middleware, app software, and app data are in the service provider’s data center.

    • Key Components: Web applications, APIs, SDKs.
    • Common Uses: Email, customer relationship management (CRM), and collaboration tools.

Choosing the Right Model for Your Needs

1. Assessing Business Requirements

Identify specific business needs such as resource availability, budget, existing IT infrastructure, and technical expertise. This assessment helps you decide which cloud service would best integrate with your business.

2. Scalability Needs

Consider whether your business requires the ability to scale resources up or down as needed. IaaS offers high scalability, which is advantageous for businesses with fluctuating workloads. PaaS and SaaS offer scalability but are typically more restrictive than IaaS.

3. Control and Customization

Determine the level of control and customization you need over your applications and data. IaaS offers the most control, making it suitable for businesses that need a highly customized environment. PaaS provides control over application deployment and management, whereas SaaS offers the least control, suitable for businesses looking for ready-to-use applications.

4. Security and Compliance Requirements

Analyze your security needs and any regulatory compliance requirements affecting your data. While all cloud models offer robust security features, the level of security control varies. IaaS allows the most detailed security management, whereas SaaS might be preferable for businesses that are satisfied with the security measures provided by the vendor.

5. Cost Efficiency

Consider your budget and how each model can optimize your spending. IaaS generally incurs costs based on actual usage, while PaaS and SaaS typically have a fixed cost but differ in terms of additional features and scale options.

Problems with Traditional Software Methodology (Legacy Platforms)

Steps in Traditional Software Development

In the conventional software development methodology, organizations must navigate a series of time-consuming and costly steps to create an application:

  1. Formation of an Idea: The process begins with conceptualizing the application’s goals, functionality, and target user base.
  2. Buying and Setting Up Hardware: Significant upfront investments are required to purchase and set up physical servers and other hardware necessary to support the software.
  3. Installing Software: Installation of the base software platforms needed to develop and run the application, which often includes dealing with multiple vendor licenses and software compatibility issues.
  4. Defining Users and Providing Accesses: Configuring the software to define user roles and access permissions, ensuring that only authorized users can access certain data or functionalities.
  5. Setting Up Means for Reporting and Analytics: Integrating or developing tools for data analysis and reporting capabilities to monitor the application’s performance and user interactions.
  6. Building Security Around the Application: Implementing security measures such as firewalls, encryption, and intrusion detection systems to protect the application and its data.
  7. Making the Application Mobile Phone Accessible: Ensuring the application is optimized for mobile devices may require additional development and testing.

Limitations of Legacy Systems

Traditional software methodologies often suffer from several limitations that can hinder business agility and innovation:

  • Costly Maintenance and Upgrades: Legacy systems require ongoing maintenance and periodic upgrades, which can be both disruptive and expensive.
  • Lack of Scalability: Scaling a traditional setup to handle increased loads typically involves purchasing additional hardware and may result in significant downtime.
  • Inflexibility: Making changes or updates to legacy systems can be slow and complex, often requiring system downtime or extensive coding.
  • Security Risks: Older systems may not be updated with the latest security patches or support modern security protocols, making them vulnerable to newer threats.

Transitioning to Modern Solutions like Salesforce

Moving to modern solutions such as Salesforce can address many of the drawbacks associated with traditional software methodologies:

  • Cloud-Based Model: Salesforce operates on a cloud-based platform that eliminates the need for physical hardware and associated capital expenditures. This model also facilitates immediate updates and upgrades without downtime.
  • Scalability and Flexibility: With Salesforce, businesses can easily scale their operations up or down based on demand without significant upfront costs. The platform’s extensive customization capabilities allow for rapid adaptation to new business requirements.
  • Enhanced Security: Salesforce provides robust security measures that are continuously updated to handle emerging threats, ensuring that data remains secure and compliance with regulatory standards is maintained.
  • Accessibility and Integration: Salesforce is cloud-based, accessible from anywhere on any device, and integrates seamlessly with other applications, improving workflow efficiency and data consistency.

Tutorial 2: Getting Started with Salesforce

In this tutorial, we will discuss the following topics:

    • Signing Up for a Salesforce Account
    • Navigating the Salesforce Interface
    • Understanding the Home Page, Tabs, and Apps
    • Basic Salesforce Terminology

Signing Up for a Salesforce Account

Before signing up, it’s important to select the Salesforce edition that best fits your business needs. Salesforce offers multiple editions, including Essentials, Professional, Enterprise,Einstein 1 Sales, and Unlimited, each providing different levels of functionality and customization capabilities. Consider factors like the size of your business, the required features, and your budget.

Here’s a brief overview:

  • Essentials: Best for small businesses needing basic CRM functionality.
  • Professional: Ideal for mid-sized businesses looking for deeper CRM integration and more customization options.
  • Enterprise: Suited for large businesses requiring extensive customization and integration capabilities.
  • Unlimited: Offers unlimited support and the most advanced features available.

The Sign-Up Process

To sign up for Salesforce:

  1. Visit the Salesforce Website: Go to salesforce.com and click on the ‘Free Trial‘ button found on the home page.
  2. Fill Out the Form: Enter your name, email address, job title, and company information. Then, select the edition that best suits you from the dropdown menu.
  3. Verification: After submitting the form, you’ll receive an email with a verification link. Click this link to verify your email address and activate your account.
  4. Set Up Your Account: Follow the on-screen instructions to set up your new Salesforce account. This will include creating a user ID and setting up a few initial configurations.

Initial Configuration Tips

After signing up, configure your Salesforce environment to optimize it for your business processes:

  • Customize Your Dashboard: Tailor your dashboard to display useful information specific to your role or business needs.
  • Import Data: You can start by importing existing customer data into Salesforce. Use the Data Import Wizard or Salesforce Data Loader for bulk imports.
  • Set Up Users: Add users and define their roles and permissions according to your organizational structure and security policies.
  • Integrate Email: Connect your email system (like Gmail or Outlook) with Salesforce to streamline communications and enhance productivity.
  • Download the Salesforce Mobile App: Enhance accessibility by downloading the Salesforce mobile app, which allows you and your team to access CRM data from smartphones or tablets.

Navigating the Salesforce Interface

The Salesforce interface is designed to be intuitive and user-friendly. It provides users with a central dashboard that displays key metrics and access to various functionalities.

Here are the main components of the Salesforce interface:

  • Header: Located at the top, the header typically includes the global search bar, setup gear, and notifications bell. Depending on your configuration, it may also feature quick action buttons.
  • Navigation Bar: This is where you’ll find tabs for various Salesforce applications and features such as Home, Contacts, Accounts, Opportunities, and more, depending on the permissions and customizations set up by your organization.
  • Sidebar: Some layouts include a sidebar that offers shortcuts to commonly used tools and features like recent records or quick links to create new records.
  • Main Pane: The central area of the interface where you interact with specific features or data. This could be a dashboard showing sales figures, a list of contact records, or a detail page for a specific account.

Customizing Your View

Salesforce allows users to customize their interface to better fit their workflow and enhance productivity.

Here’s how you can customize your view:

  • Personalize Tabs and Layouts: You can adjust which tabs are visible in your navigation bar and organize them according to your preferences or job role.
  • Dashboard Widgets: Customize your main dashboard to display relevant data and metrics. You can add, remove, or rearrange components to suit your needs.
  • Theme and Display Settings: You can change Salesforce’s overall color theme and adjust display settings such as text size and contrast to improve visibility or match company branding.

Using the App Launcher

The App Launcher is a tool in Salesforce that allows you to access all your apps and items from one place.

Here’s how to use it:

  1. Access the App Launcher: Click on the grid icon in the top left corner of the Salesforce interface.
  2. Browse or Search Apps: You’ll see a list of all available apps. Use the search bar at the top of the App Launcher to quickly find the app you need.
  3. Customizing the App Launcher: You can organize your apps by dragging and arranging them according to your usage preferences. You can also pin frequently used apps to the top for quicker access.

Understanding the Home Page, Tabs, and Apps

Home Page Components and Features

The Salesforce Home Page is the central hub for daily activities and provides a snapshot of key metrics and performance indicators. It is customizable to fit individual or team needs and typically includes the following components:

  • Dashboard: Displays visual representations of real-time data, such as charts and graphs, to give users a quick overview of their performance metrics or business analytics.
  • Assistant: Features intelligent reminders, alerts, and suggestions to help users prioritize daily tasks and follow-ups.
  • Recent Items: Quickly access recently viewed records or items for easy retrieval.
  • Customizable Components: Depending on your organization’s setup and your permissions, you can add or remove various widgets, such as task lists, calendar events, or news.

Exploring Tabs for Standard Objects

Tabs in Salesforce are used to navigate between different areas of the platform efficiently. Each tab represents a standard or custom object like Accounts, Contacts, Opportunities, and more, which are essential components of the CRM system:

  • Accounts: Manage your company’s relationships with partners, competitors, and customers.
  • Contacts: Keep track of individuals associated with your accounts and your dealings with them.
  • Opportunities: Monitor sales deals in progress and effectively manage stages from lead to close.
  • More Tabs: Depending on your Salesforce configuration, additional tabs, such as Cases, Campaigns, or custom objects created to suit your business processes, might be available.

Accessing and Organizing Apps

Apps in Salesforce are collections of tabs and objects designed to serve various functional organizational roles, such as sales, customer service, or marketing.

Here’s how you can access and organize apps:

  1. Using the App Launcher: Click on the App Launcher icon to view all available apps. You can search for a specific app by name or scroll through the list.
  2. Customizing App Visibility: Organize which apps are visible by default and arrange them in the App Launcher based on your usage or organizational roles.
  3. Creating Custom Apps: Users with the necessary permissions can create custom apps in Salesforce, choosing which tabs and objects to include based on specific business needs.

Basic Salesforce Terminology

Common Terms and Definitions

Getting familiar with Salesforce terminology is important for effectively navigating and utilizing the platform.

Here are some common terms:

Object and Record Basics

In Salesforce, objects are database tables that allow you to store data specific to your organization in a structured manner.

There are two types of objects:

Each individual entry or item within an object is called a record. For instance, if “Account” is an object, then each customer account your organization has would be a record in the “Account” object.

Understanding Salesforce's Data Model

Salesforce’s data model revolves around understanding how objects are related to one another and how these relationships are structured.

Key concepts include:

  • Relationships: Links between objects that you can configure to model how your organization’s data interacts and relates.

Common types include:

  • Lookup Relationships: Create a simple relationship between two objects, similar to a “foreign key” in relational databases.
  • Master-Detail Relationships: Create a tightly linked relationship where the detail (child) record’s lifecycle (such as its creation and deletion) is dependent on the master (parent) record.
  • Many-to-Many Relationships: Use a junction object to create complex many-to-many relationships between two objects.
  • Schema Builder: A tool within Salesforce that allows users to visualize and edit the data model, including objects and relationships, providing a graphical representation of the organization’s data architecture.

Tutorial 3: Salesforce Objects and Data Management

In this tutorial, we will discuss the following topics:

    • Explanation of Standard vs. Custom Objects
    • How to Manage Data (CRUD Operations)
    • Guidelines on Importing and Exporting Data
    • Insight into Object Relationships

Standard vs. Custom Objects

Standard vs. Custom Objects

Standard objects are pre-defined by Salesforce and common across all Salesforce environments. They include essential business entities such as Accounts, Contacts, Opportunities, Leads, and Cases, which are integral to typical CRM functionalities.

Standard objects come with a pre-defined structure, including fields and behaviors designed to support common business processes and relationships among different entities (e.g., Accounts related to Contacts).

Definition of Custom Objects

Custom objects are user-defined objects created to store information specific to your organization’s needs that are not covered by Salesforce’s standard objects. These objects allow you to store data unique to your operations and can be related to other custom or standard objects to maintain relevant relationships.

Custom objects include custom fields, page layouts, relationships, reports, and dashboards specific to your business processes.

When to Use Standard vs. Custom Objects

Choosing between standard and custom objects typically depends on several factors:

Business Requirements

Standard objects should be used when your data management and process requirements align closely with the pre-defined Salesforce functionalities. For instance, managing customer contacts or tracking opportunities is straightforward, using standard objects like Contacts and Opportunities.

Specialized Processes

Custom objects are suitable when specific data needs to exceed what standard objects offer. If your business processes require tracking additional, unique information or developing new relationships that do not exist in standard objects, creating a custom object is the right approach.

Integration and Compatibility

Standard objects are often better for situations where you anticipate integrating Salesforce with other software applications, as these are more likely to be directly supported by third-party integration tools.


However, custom objects can be necessary if the integration requires data or processes unique to your organization.

Long-term Scalability

Consider whether the solution you choose will scale with your business needs. Standard objects provide less flexibility but ensure stability and less maintenance effort. Custom objects offer more flexibility to evolve as your business grows but may require more ongoing customization and maintenance.

How to Manage Data (CRUD Operations)

Creating Records

To create new records in Salesforce, follow these steps:

  1. Navigate to the Object: Access the object tab where you want to create a new record, such as Accounts, Contacts, or a custom object.
  2. Use the New Button: Click the ‘New’ button typically found at the top of the list view or related list.
  3. Fill Out the Form: Enter the necessary information in the fields provided in the form. Required fields are marked with a red asterisk (*).
  4. Save the Record: After completing the form, click the ‘Save’ button to create the record. You can also use ‘Save and New’ if you need to create multiple records sequentially.

Updating Records

To update existing records in Salesforce:

  1. Open the Record: Navigate to the record you wish to update.
  2. Edit the Record: Click the ‘Edit’ button at the top of the record. This will open the edit page, which is similar to the new record form.
  3. Make Changes: Modify the fields as necessary. You can change one or multiple fields based on your needs.
  4. Save Changes: Click the ‘Save’ button to apply your changes. If you decide against modifying the record, you can click ‘Cancel’ to return to the record without saving any changes.

Deleting Records

To delete records in Salesforce:

  1. Locate the Record: Open the record that you want to delete.
  2. Delete the Record: Click the ‘Delete’ button, usually at the top of the record.
  3. Confirm Deletion: Salesforce will ask for confirmation to ensure that you want to delete the record. Confirm your choice. Note that this action may be irreversible depending on your organization’s data management policies and the recycle bin settings.

Guidelines on Importing and Exporting Data

Preparing Your Data for Import

Before importing data into Salesforce, proper preparation is important to ensure accuracy and efficiency.

Here’s how to prepare your data:

  1. Cleanse Data: Review your data for accuracy. Remove duplicates, correct errors, and ensure consistency in formatting, especially in date and currency fields.
  2. Structure Data: Organize your data in a format compatible with Salesforce. This typically involves arranging data into columns that match the Salesforce fields where you want to import data.
  3. Check Field Types: Ensure that the data types in your file match those in Salesforce (e.g., text, number, date).
  4. Download Templates: For an easier setup, download the import templates from Salesforce for specific objects like Contacts or Leads to ensure you have the correct fields and structure.

Using Salesforce Data Import Wizard

The Salesforce Data Import Wizard is an intuitive tool that makes importing data for standard Salesforce objects like Accounts, Contacts, Leads, and custom objects easy.

Here’s how to use it:

  1. Access the Import Wizard: Navigate to the Setup menu, enter ‘Data Import Wizard’ in the Quick Find box, and select it under Data Management.
  2. Choose the Object: Select the data type you wish to import (e.g., Accounts, Contacts) and follow the instructions provided.
  3. Upload Your Data File: Upload the CSV file you’ve prepared, mapping the fields in it to the corresponding Salesforce fields.
  4. Perform the Import: Review your data and configurations, then start the import. Salesforce will process the file and import your data, providing a summary of the import once completed.

Using Salesforce Data Loader for Bulk Operations

For more complex imports or when dealing with large volumes of data (over 50,000 records), the Salesforce Data Loader is a more robust tool.

Here’s how to use it:

  1. Install Data Loader: Download and install the Data Loader from Salesforce Setup.
  2. Prepare CSV Files: Ensure your CSV files are well-organized and that the fields are properly mapped to Salesforce fields.
  3. Log In and Configure: Open Data Loader, log in using your Salesforce credentials, and choose whether to insert, update, upsert, delete, or export data.
  4. Select Your Data File: Choose the CSV file for import and map the fields in your file to the corresponding fields in Salesforce.
  5. Execute the Operation: Run the operation, and the Data Loader will begin processing your data. Errors and successes will be logged, allowing you to make any necessary adjustments.

Exporting Data from Salesforce

Exporting data from Salesforce can be accomplished through several methods:

  1. Reports: Create a report with the required data and export it to Excel or CSV.
  2. Data Export Service: Use Salesforce’s scheduled data export service to back up data. This can be found in Setup under ‘Data Export’.
  3. Data Loader: Use Data Loader in export mode to extract large data sets based on specific criteria.

Insight into Object Relationships

Understanding how different objects relate to each other within Salesforce is important for modeling your data effectively.

Here’s how these relationships work and how to configure them:

Types of Relationships in Salesforce

Salesforce supports several types of relationships that link objects together to reflect real-world relationships between business entities:

  • Lookup Relationships: Create a simple link between two objects. This relationship is loosely coupled, meaning the linked records remain independent. Deleting one record does not affect the other.
  • Master-Detail Relationships: Create a tightly coupled relationship between two objects. The detail (child) record’s lifecycle depends on the master (parent) record. Deleting the master record will delete all related detail records.
  • Many-to-Many Relationships: Facilitated by using a junction object, this relationship allows you to link multiple records from one object to multiple records from another object.

Configuring Lookup Relationships

To configure a lookup relationship:

  1. Choose the Child Object: Navigate to the Object Manager in Setup and select the object containing the lookup field.
  2. Add a New Field: Choose ‘New’ under Fields & Relationships and select Lookup Relationship.
  3. Select the Parent Object: Choose the object to which this new field will link.
  4. Configure Field Details: Set field properties, such as field name, field level security, and page layout placement.
  5. Save and Test: Save your changes and test the relationship by creating or editing records in the child object.

Configuring Master-Detail Relationships

To set up a master-detail relationship:

  1. Identify the Master and Detail Objects: Decide which object will be the master and which will be the detail.
  2. Create the Detail Field: In the Object Manager, select the detail object and add a new field, selecting Master-Detail Relationship.
  3. Define the Master Object: Specify which object is the master in this relationship.
  4. Field Settings: Configure additional settings, such as sharing settings and whether to include the master’s record owner on the detail record.
  5. Deployment: Place the new field on the appropriate page layouts and test the functionality by manipulating the records involved.

Using Junction Objects for Many-to-Many Relationships

For linking many records from one object to many records from another, use a junction object:

  1. Create a Junction Object: This object will serve as the link between the two main objects.
  2. Add Master-Detail Fields: Add two master-detail relationship fields to this new junction object, each linking to one of the main objects involved in the relationship.
  3. Configure the Junction Object: Define how records in this object will be created and managed. Automated processes or custom interfaces often help manage these records.
  4. Utilize and Test: Use the junction object to associate multiple records from each main object and ensure the relationship behaves as expected.

Tutorial 4: Working with Leads and Opportunities

In this tutorial, we will discuss the following topics:

    • Process of Capturing Leads and Converting Them into Opportunities
    • Managing the Sales Process within Salesforce
    • Utilizing Reports and Dashboards for Sales Insights

Process of Capturing Leads and Converting Them into Opportunities

Understanding Leads in Salesforce

In Salesforce, a lead represents a potential customer or prospect. Leads typically come from various sources, such as website inquiries, trade shows, direct mail campaigns, and other marketing efforts. Salesforce allows you to track these leads, providing a framework to convert them into more defined sales opportunities, accounts, and contacts once qualified.

Capturing Leads

Capturing leads effectively ensures a steady stream of potential customers in your sales process.

Salesforce offers several methods to capture leads:

  • Manual Entry: Sales representatives or data entry staff can manually enter leads into Salesforce. This method is common for leads gathered from offline sources or personal interactions.
    • Navigate to the Leads tab and click on ‘New’.
    • Fill in the lead details such as name, company, contact information, and any relevant notes or custom fields.
    • Save the lead to add it to your Salesforce database.
  • Web-to-Lead: Salesforce allows you to capture leads directly from your website using a form that visitors can fill out. The data entered into the form is automatically created as a lead in Salesforce.
    • Set up by navigating to Setup, entering ‘Web-to-Lead’ in the Quick Find box, and then following the instructions to create a web-to-lead form that you can embed on your website.
    • Customize the form fields to capture the necessary information.
    • Once the form is submitted by a website visitor, the information is instantly converted into a lead in Salesforce.

Lead Conversion

Once a lead is deemed qualified and ready to engage more deeply, it can be converted into an account, contact, and opportunity.

This conversion process is a critical step in the sales cycle.

  • Conversion Process:
    • Open the lead record that you wish to convert.
    • Click the ‘Convert’ button at the top of the lead record.
    • Salesforce will prompt you to confirm the conversion details, including whether to create a new account or merge with an existing one and whether to create an opportunity.
  • Mapping Lead Fields to Opportunity, Account, and Contact:
    • During the conversion process, Salesforce allows you to map standard and custom lead fields to fields in the account, contact, and opportunity records.
    • Set up field mapping by going to Setup, entering ‘Lead Fields’ in the Quick Find box, and selecting ‘Map Lead Fields’. This lets you define which lead data should populate corresponding fields in accounts, contacts, and opportunities after conversion.

Managing the Sales Process within Salesforce

Overview of the Sales Process

The sales process in Salesforce is designed to systematically manage a lead’s journey from the initial stage of capturing to the final stage of closing the sale, providing visibility and control over each step. This process is often mapped in Salesforce through various stages, each representing a significant milestone in the sales cycle.

Stages of the Sales Process

Typically, the sales process in Salesforce is broken down into several key stages, which might include:

  • Prospecting: Identifying potential customers.
  • Qualification: Assessing the lead’s potential to purchase.
  • Needs Analysis: Understanding the customer’s specific needs.
  • Proposal/Value Proposition: Proposing a solution to meet the customer’s needs.
  • Negotiation/Review: Discussing the terms and conditions of the sale.
  • Closure: Finalize the sale and begin the delivery or implementation of the solution.

Customizing the Sales Process

Customizing the sales process in Salesforce allows organizations to align the platform with their specific sales methodologies and customer engagement strategies.

Modifying Sales Stages

  • Navigate to the Object Manager within Setup.
  • Select the Opportunity object and click on Fields & Relationships.
  • Go to the Stage field and modify the picklist values to reflect the stages of your sales. This may include adding new stages, renaming existing ones, or removing unnecessary stages.

Creating Record Types for Different Sales Processes

  • Different sales processes may require different record types, especially if your organization handles multiple product lines or services that require unique sales approaches.
  • In Setup, go to the Object Manager and select the Opportunity object.
  • Choose Record Types and create new ones according to your different sales processes, assigning different page layouts and available picklist values as needed.

Tracking and Managing Opportunities

Effective opportunity management is important for maximizing sales success. Salesforce provides tools and features to track opportunity progress and analyze data related to potential sales.

Opportunity Management Best Practices

  • Regular Updates: Keep opportunity records up to date with the latest interaction and negotiation details.
  • Milestone Tracking: Use the stage field to track the progress of each opportunity through the sales cycle.
  • Collaboration Tools: Utilize features such as Chatter to collaborate with team members on opportunities.
  • Reports and Dashboards: Create and utilize custom reports and dashboards to monitor key metrics like win rate, average deal size, and stage duration.

Utilizing Reports and Dashboards for Sales Insights

Introduction to Salesforce Reports and Dashboards

Salesforce reports and dashboards are powerful tools designed to provide real-time insights into your sales activities, enabling better decision-making and strategy development. Reports offer detailed data analysis, while dashboards provide a visual summary of that data, often displayed as graphs or charts.

Types of Reports

Salesforce categorizes reports into several types, each suited to different analytical needs:

Creating Custom Reports

To create a custom report:

  1. Navigate to the Reports tab and click ‘New Report’.
  2. Select the report type that matches the data you need to analyze.
  3. Use the report builder to drag and drop fields into the report format.
  4. Apply filters and groupings to refine the data and focus on what’s important.

Run the report to view results and save it for future access or modification.

Building Dashboards

Dashboards in Salesforce are composed of individual dashboard components, each representing a report or part of a report.

To build a dashboard:

  1. Go to the Dashboards tab and select ‘New Dashboard’.
  2. Choose a layout and start adding components.
  3. Select the source report for each component and configure how data should be displayed (e.g., pie chart, bar graph, line chart).

Dashboard Components

Common dashboard components include:

Customizing Dashboards for Sales Insights

Customizing dashboards specifically for sales insights involves:

  1. Choosing components that reflect key performance indicators like close rates, lead conversion rates, and sales cycle lengths.
  2. Arranging components in a way that tells a coherent story about the sales performance and potential bottlenecks.
  3. Using color and visual hierarchies to draw attention to the most important metrics.

Interpreting Sales Data

Interpreting data from reports and dashboards involves analyzing:

Analyzing Sales Trends

Utilize historical data to identify patterns or trends that can predict future sales performance. This analysis helps in planning and forecasting and in adjusting strategies in response to anticipated changes.

Improving Sales Strategy with Data

Data-driven strategies can dramatically improve sales outcomes by:

  • Identifying high-performing lead sources and focusing efforts on those channels.
  • Tailoring sales pitches based on insights gathered from customer data.
  • Optimizing resource allocation based on which sales activities generate the best returns.

Effectively utilizing Salesforce reports and dashboards equips sales teams with the insights needed to drive performance, optimize strategies, and ultimately achieve better sales results.

Tutorial 5: Introduction to Salesforce Automation

In this tutorial, we will discuss the following topics:

    • Overview of Workflow Rules and the Process Builder
    • Creating Simple Automation Processes
    • Basics of Approval Processes in Salesforce

Overview of Workflow Rules and the Process Builder

Understanding Workflow Rules

Workflow rules in Salesforce are automated processes that trigger actions based on specific criteria within a record. These rules are designed to help automate standard internal procedures and processes to increase efficiency within the CRM system.

For example, workflow rules can automatically send email alerts, update fields, create tasks, or send outbound messages without manual intervention.

When to Use Workflow Rules

Workflow rules are best used when:

  • Simple Logic is Needed: The decision process or criteria for triggering the action is straightforward and does not require multiple conditions.
  • Immediate Actions are Required: Actions that must occur immediately after a record is created or updated.
  • Standard Operations: For standard operations such as sending a notification when a deal reaches a certain stage or automatically updating field values based on specific changes in the record.

Creating Workflow Rules

To create a workflow rule:

  1. Navigate to Setup and enter ‘Workflow Rules’ in the Quick Find box, then select it.
  2. Click ‘New Rule’, select the object to which the rule applies, and then define the rule criteria that must be met for the rule actions to execute.
  3. Specify the actions to take when the criteria are met, such as sending an email, updating a field, or creating a task.
  4. Activate the rule to put it into use.

Exploring the Process Builder

The Process Builder is a more powerful tool than workflow rules. It provides a graphical interface for creating automated processes, allowing you to automate complex business processes with multiple steps and conditions.

Advantages of the Process Builder Over Workflow Rules

    • Complex Workflows: Allows the creation of multi-step processes with conditional branching.
    • Visual Interface: Offers a more intuitive and visual setup process than the traditional workflow rules interface.
    • Triggered by More Than Just Record Changes: This can be triggered by changes in records, platform events, or even invocable methods.

Creating Processes with the Process Builder

To create a process using the Process Builder:

  1. Go to Setup and type ‘Process Builder’ in the Quick Find box, then select it.
  2. Click ‘New’ and provide a name and description for the process.
  3. Define the process’s start condition (e.g., when a record is created or changed).
  4. Add criteria that must be met for the actions to execute. You can define multiple criteria nodes and associate specific actions with each.
  5. Specify the actions to execute when the criteria are met, such as creating records, updating any related records, or calling Apex classes.
  6. Review and activate the process to start using it.

By leveraging Salesforce automation tools like Workflow Rules and the Process Builder, organizations can significantly enhance operational efficiencies, reduce manual tasks, and ensure consistent business processes. These tools transform how businesses interact with their CRM data, making complex business processes more manageable and reliable.

Creating Simple Automation Processes

Automation with Workflow Rules

Workflow Rules in Salesforce allow you to automate simple business processes without coding. These rules are triggered when specific conditions are met, performing predefined actions to increase efficiency.

Examples of Workflow Actions

Automation with the Process Builder

The Process Builder provides a more robust framework for automating complex workflows with a user-friendly graphical interface.

Designing a Simple Process

  1. Define the Trigger: Determine what will start the process, such as creating a new record or updating a field.
  2. Set the Criteria: Specify the conditions under which the process should run. For instance, a process might only run when an opportunity’s amount is greater than $10,000.
  3. Configure Actions: Decide what actions the process will perform when the criteria are met. Actions could include creating a record, updating related records, or even launching a custom flow.
  4. Activate the Process: Once configured, activate the process to make it live. Always test in a sandbox environment before deploying it in production.

Best Practices for Process Builder Automation

  • Plan Before Building: Map out your processes on paper or with a diagramming tool before configuring them in Salesforce. This planning helps clarify the steps involved and the logic needed.
  • Use Descriptive Names: Name your processes clearly and descriptively so that others can easily understand their purpose without having to dig deep into the configurations.
  • Opt for Bulkification: Ensure your processes are designed to handle bulk actions to avoid hitting Salesforce limits. This is especially important in processes that are triggered by common actions like record updates.
  • Monitor and Optimize: Use Salesforce’s built-in monitoring tools to track the performance and execution of your processes. Review them periodically and make adjustments as necessary to improve efficiency or address new business needs.
  • Error Handling: Configure error handling within the Process Builder to manage exceptions gracefully. This might involve setting up alternative actions or notifying users when errors occur.

By implementing these automation tools, Salesforce users can streamline their operations, reduce manual errors, and ensure greater adherence to organizational protocols. Workflow Rules and the Process Builder enable teams to focus more on strategic activities by automating routine tasks and data management functions.

Basics of Approval Processes in Salesforce

Introduction to Approval Processes

Approval processes in Salesforce are automated workflows designed to ensure that records meet certain criteria before proceeding to the next stage or being finalized. These processes are critical when decisions need validation by one or more designated approvers, such as expense approvals, discount authorizations, or contract sign-offs.

When to Use Approval Processes

Approval processes are particularly useful when:

  • Regulatory Compliance: Certain actions or records must comply with internal policies or external regulations.
  • Quality Control: Ensuring that data meets predefined standards before proceeding.
  • Hierarchical Decision Making: Actions that require consent from higher management or different departments.

Configuring Approval Processes

Configuring an approval process involves:

  • Defining the criteria for records that need approval.
  • Specifying the steps involved in the approval.
  • Identifying the approvers.

Salesforce allows you to customize the process to fit your organizational workflows.

Steps to Create an Approval Process

To create a Approval Process:

  1. Setup: Navigate to Setup, enter ‘Approval Processes’ in the Quick Find box, and select it under the appropriate object (e.g., Opportunities).
  2. Create a New Approval Process: Use the standard setup wizard to start creating a new approval process. Choose either a Jump Start Wizard for a simple process or a Standard Setup Wizard for more detailed configurations.
  3. Specify Entry Criteria: Define the conditions a record must meet to trigger the approval process. For example, an opportunity might require approval if the discount percentage is above a certain threshold.
  4. Define Approval Steps: Outline the steps the record goes through during the approval process, including who must approve it at each step and what happens if the record is approved or rejected.
  5. Set Up Email Alerts: Configure email notifications for approvers to let them know when their input is needed.
  6. Activation: Activate the approval process to make it live.

Managing Approval Requests

Once an approval process is in place, managing requests efficiently is key to maintaining workflow continuity.

  • Monitoring Requests: Use the Approval History related list on record pages to monitor where each request stands in the approval process.
  • Manual Actions: Users can manually push records into the approval process if they meet the criteria and require approval.

Approving and Rejecting Requests

Approvers receive notification emails or see approval requests in their Salesforce home page under the “Items to Approve” section, where they can:

  • Approve: Give consent for the record to proceed to the next step or finalize the action.
  • Reject: Deny the request, which may send the record back to the submitter for adjustments or halt further actions, depending on the process configuration.
  • Reassign: Send the approval request to another user if they are better suited to make the decision.

Approval processes in Salesforce help enforce business rules and ensure that important decisions are reviewed and authorized correctly, enhancing control over critical business operations. This structured approach increases transparency and helps maintain the integrity and accuracy of data throughout the organization.

Tutorial 6: Customizing Salesforce

Guide on Creating Custom Fields and Objects

Creating Custom Fields

Custom fields in Salesforce allow you to tailor your data capture to specific business needs, providing additional detail beyond standard field offerings.

Types of Custom Fields

Salesforce supports various data types for custom fields, including:

  • Text: For short or long strings of text.
  • Number: For numerical values.
  • Picklist: For a dropdown list of predefined options.
  • Date/Time: For specifying dates and times.
  • Checkbox: For simple true/false conditions.
  • Lookup Relationship: To create a relationship between this object and another object.

Adding Custom Fields to Standard and Custom Objects

To add a custom field:

  1. Navigate to Setup: Enter the name of the object (e.g., Account) in the Quick Find box, then select ‘Fields & Relationships’ from the object’s setup menu.
  2. Create New Field: Click on ‘New’ and select the appropriate data type for your custom field. Fill in the necessary details like field label, length, and field-specific settings.
  3. Define Field-Level Security: Decide which profiles can view or edit the field.
  4. Add to Page Layouts: Ensure the field is added to the relevant page layouts so it is visible and usable within records.

Creating Custom Objects

Custom objects provide a structure for storing information unique to your organization and are not covered by Salesforce’s standard objects.

Defining Custom Objects

  1. Navigate to Setup: Enter ‘Objects’ in the Quick Find box, then select ‘Object Manager’.
  2. Create New Custom Object: Click on ‘Create’ and select ‘Custom Object’. Enter details such as the object name, label, and description.
  3. Configure Settings: Set features such as record name, data type, and whether the object should have reports, activities, or be trackable via history.

Setting Up Custom Object Relationships

To relate custom objects to other objects (custom or standard):

  1. Create a Relationship Field: Within the custom object setup, choose to add a new field and select a relationship type (lookup or master-detail).
  2. Select the Related Object: Specify the object to which this new custom object should relate. For example, a custom object for Vendor might relate to the Account object via a lookup relationship.
  3. Configure Relationship Details: Define the specifics of the relationship, including related lists, cascading delete rules (for master detail), and sharing settings.

Creating and managing custom fields and objects in Salesforce allows organizations to extend the functionality of their CRM to fit precise business needs, ensuring all necessary data is captured and managed effectively.

Customizing Page Layouts and Understanding Record Types

Customizing Page Layouts

Page layouts in Salesforce control how fields, related lists, and custom links are displayed on object record pages. They play an important role in ensuring that users see the most relevant information tailored to their needs.

Modifying Layouts for Standard and Custom Objects

  • Access Page Layouts: Navigate to Setup, enter the name of the object in the Quick Find box, then click ‘Page Layouts’ under the object settings.
  • Edit Layout: Select a layout to modify or click ‘New’ to create a new layout. Use the drag-and-drop interface to move elements around on the layout.
  • Customize Components: Add or remove fields, related lists, buttons, and sections according to your organization’s or user profiles’ specific needs.

Page Layouts and User Profiles

  • Assign different page layouts to different user profiles to ensure that users have access to the appropriate tools and data relevant to their roles. For example, sales reps may see different fields on an Opportunity page compared to a manager.

Understanding and Utilizing Record Types

Record types in Salesforce allow you to offer different business processes, picklist values, and page layouts to different users based on their profiles. They help manage and streamline processes across diverse teams and business units within the organization.

Purpose of Record Types

  • Differentiate Processes: Use record types to create variations of a standard sales process, customer support process, or any other business process, each tailored to specific needs.
  • Control Picklists: Customize picklist values available for a given record type, ensuring users select from relevant options that apply to their process or division.

Creating and Managing Record Types

  • Create a Record Type: Navigate to Setup, find the object you want to configure and select ‘Record Types’. Click ‘New’ and define the record type’s name, description, and associated processes.
  • Assign Page Layouts: You can assign specific page layouts to each record type, allowing you to customize the user interface further.
  • Set Picklist Values: Specify which values are available for picklist fields for each record type.
  • Manage Access: Determine which profiles can use each record type, ensuring that users only see and use the record types applicable to their roles and responsibilities.

Understanding how to customize page layouts and utilize record types effectively is important for tailoring Salesforce to fit your organization’s unique processes and workflows.

Introduction to Salesforce AppExchange

Exploring the AppExchange

Salesforce AppExchange is an online marketplace offering a diverse array of cloud computing applications and services designed for Salesforce users. These apps extend Salesforce’s functionality and allow users to find customized solutions tailored to their specific industry, department, or business needs.

Finding and Selecting Apps

  • Search and Browse: Navigate to the AppExchange website and use the search bar or browse by categories, such as Sales, Marketing, Customer Service, IT & Administration, etc., to find apps that suit your requirements.
  • Filter Options: Utilize filters such as price, ratings, and compatibility to effectively narrow the search results.

Evaluating App Reviews and Ratings

  • Read Reviews: Look at what other users say about the app to gain insights into its performance and utility. Pay attention to both positive and negative reviews for a balanced view.
  • Check Ratings: Higher ratings generally indicate a better user experience and app reliability. Also, consider the number of reviews an app has received to gauge its popularity and user base.

Installing and Customizing Apps

Installing the right apps can significantly enhance your Salesforce environment by adding or improving new functionalities.

Installation Best Practices

  • Test First: Always install new apps in a sandbox environment first. This allows you to test the app’s functionality and ensure it integrates well with your existing setup without affecting your live data.
  • Check Dependencies: Some apps may require you to enable certain features or install other apps. Ensure you meet all prerequisites before installation.
  • Review Security Settings: Understand the app’s security permissions and data access settings. Ensure they align with your organization’s security policies.

Customizing Apps to Fit Your Business Process

  • Adjust Settings: Most apps offer configurable settings that you can adjust to better fit your business processes.
  • Modify Page Layouts: Incorporate the app’s components into your page layouts where necessary to ensure they are accessible to the right users.
  • Train Users: Train your team on how to use the new app effectively. This ensures that the app is utilized to its full potential and integrates smoothly into your business processes.

Using Salesforce AppExchange effectively involves more than just installing apps. It requires a careful approach to selection and customization, ensuring that each app fits your specific needs and adds value to your Salesforce environment, enhancing productivity and efficiency.

Tutorial 7: What is Salesforce Marketing Cloud?

What is Salesforce Marketing Cloud?

Salesforce Marketing Cloud is a comprehensive digital marketing suite that enables organizations to create and manage marketing relationships and campaigns with customers across multiple channels.

As a part of Salesforce’s suite of products, Marketing Cloud integrates deeply with other Salesforce applications, providing a unified approach to managing customer journeys. This platform is designed to help marketers personalize customer experiences, streamline communications, and improve customer engagement through data-driven insights.

Overview and Key Features

Salesforce Marketing Cloud offers a variety of tools and capabilities tailored to meet the diverse needs of modern marketers.

Key features of Marketing Cloud include:

  • Journey Builder: Allows marketers to design and automate customer journeys across channels, guiding customers through a personalized experience based on their behavior and preferences.
  • Email Studio: Provides robust email marketing capabilities, enabling users to create, send, and track email campaigns. It offers advanced segmentation, A/B testing, and comprehensive analytics to optimize email interactions.
  • Social Studio: Helps manage social media strategies by allowing teams to listen to, engage with, and publish content on social platforms. It includes tools for social listening, content scheduling, and community management.
  • Advertising Studio: Enables targeted advertising by syncing CRM data with digital advertising platforms to create personalized advertising experiences across Google, Facebook, LinkedIn, and other networks.
  • Mobile Studio: Offers SMS, MMS, push notifications, and group messaging capabilities to reach customers on their mobile devices effectively.
  • Web Personalization: Tools to create personalized web content that resonates with visitors based on their interactions and behaviors.
  • Interaction Studio: Monitors and visualizes customer interactions in real-time, allowing marketers to deliver contextually relevant experiences during a customer’s journey.
  • Data Management Platform (DMP): This platform collects and organizes data from various sources to create targeted marketing segments and provide insights for deeper personalization.
  • Analytics Builder: Offers data analysis tools that help measure and optimize marketing efforts across channels.

Need for Salesforce Marketing Cloud

Challenges in Modern Marketing

Today’s marketing landscape is characterized by a number of complex challenges that require robust and versatile solutions.

These challenges include:

  • Data Overload: Marketers often need help with the large volume of data generated from various channels. This makes it difficult to use this data effectively for targeted marketing strategies.
  • Customer Expectations: Modern consumers expect personalized, consistent experiences across all channels. Meeting these expectations requires sophisticated tools that can manage and leverage customer data effectively.
  • Channel Proliferation: With the rise of digital platforms, marketers must engage with customers across multiple channels (social, mobile, email, web, etc.). Coordinating these interactions to ensure a seamless customer experience is increasingly complex.
  • Integration Issues: Many organizations use different tools for different marketing functions, leading to integration challenges that can hinder a unified view of customer interactions and efficiencies.
  • Speed of Innovation: The rapid pace of technological change means marketers must continually adapt to new tools and techniques. Staying current can be resource-intensive and requires scalable solutions.

How Marketing Cloud Addresses These Challenges

Salesforce Marketing Cloud offers comprehensive solutions tailored to meet the evolving needs of modern marketers and overcome these challenges:

1. Unified Customer View

Marketing Cloud integrates data from various sources to provide a single view of the customer. This helps marketers deliver more personalized content and create consistent customer experiences across all touchpoints.

2. Cross-Channel Marketing

With tools like Journey Builder and Social Studio, Marketing Cloud enables marketers to create and manage cross-channel marketing campaigns from a single platform. This ensures cohesive communication strategies that engage customers effectively wherever they are.

3. Advanced Data Analytics

Features like Analytics Builder and DMP help marketers analyze big data to derive actionable insights, predict customer behavior, and make data-driven decisions that enhance campaign effectiveness.

5. Automated Personalization

Tools such as Email Studio and Web Personalization allow for automated, tailored communications based on customer behaviors and preferences, increasing engagement and conversion rates.

6. Scalability and Flexibility

Marketing Cloud scales to accommodate growth in data volume and campaign complexity without sacrificing performance. This flexibility ensures marketers can adapt to changes in the market landscape and customer behavior without switching platforms.

7. Integration Capabilities

Marketing Cloud can seamlessly integrate with other Salesforce products (such as Sales Cloud and Service Cloud) and external systems, providing a comprehensive ecosystem that enhances data flow and accessibility.

What Can You Do with Salesforce Marketing Cloud?

Data-driven Messaging

Salesforce Marketing Cloud leverages vast amounts of data to tailor communications specifically to individual customer preferences and behaviors. By integrating data from various sources, marketers can create highly personalized and relevant messages that resonate with each customer, increasing engagement and improving customer relationships.

Multi-channel Messaging

With Marketing Cloud, you can deliver consistent and coordinated messages across multiple channels such as email, social media, mobile apps, and websites. This capability ensures that customers receive a unified experience, no matter how or where they choose to interact with your brand, enhancing overall engagement and brand perception.

Dynamic Components

Utilize dynamic components within Salesforce Marketing Cloud to adapt your marketing campaigns in real-time based on customer interactions and behaviors. This adaptability allows marketers to respond quickly to changes in customer preferences or market conditions, ensuring campaigns remain relevant and effective.

Products in Salesforce Marketing Cloud

Here’s an overview of the core products and their primary functionalities:

1. Email Studio

The backbone for email marketing within Marketing Cloud. It provides tools to create, send, and track email campaigns. Features include sophisticated segmentation, dynamic content, and comprehensive analytics to measure campaign effectiveness.

2. Social Studio

This product manages your social media strategy, from posting and scheduling content across various social platforms to monitoring and engaging with users. It helps marketers understand social sentiment and trends, enabling responsive and targeted social media campaigns.

3. Mobile Studio

This product allows marketers to reach customers through SMS, MMS, push notifications, and group messages. Mobile Studio is important for campaigns that need to engage users directly on their mobile devices, offering features for geotargeting and automation based on mobile user behaviors.

4. Advertising Studio

This product integrates advertising with your marketing strategy across digital platforms like Google, Facebook, and Instagram. It leverages CRM data to create targeted, secure, and privacy-compliant advertising campaigns that align with broader marketing goals.

5. Journey Builder

This product enables marketers to design and automate customer journeys across channels and devices. This tool helps create personalized customer experiences at scale, with decision splits and timing controls to deliver the right message at the right moment.

6. Interaction Studio

This product visualizes and manages real-time customer experiences, allowing marketers to see how consumers are interacting with the brand across channels and devices and react with contextually relevant messages or offers.

7. Data Studio

A data sharing platform that helps marketers leverage data for deeper insights and segmentation. It enhances targeting by allowing the secure exchange of data within a marketplace environment.

8. Pardot

Designed specifically for B2B marketing automation, Pardot automates lead management and facilitates sales alignment with features like lead scoring, email marketing, and comprehensive lead nurturing capabilities.

Overview of Each Product's Functionality

  • Email Studio: Tailor and automate email communications based on customer data and behaviors and analyze performance metrics to optimize strategies.
  • Social Studio: Manage all social media interactions in one place, from publishing and scheduling to monitoring and analytics, ensuring consistent brand messaging.
  • Mobile Studio: Engage customers with timely and location-based mobile messaging to enhance the immediacy of marketing communications.
  • Advertising Studio: Use CRM data to create cohesive, cross-channel advertising campaigns that maintain message consistency and improve conversion rates.
  • Journey Builder: Build complex, multi-stage journeys for different segments, testing and refining pathways based on customer responses and interactions.
  • Interaction Studio: Capture and act on real-time customer actions, tailoring experiences dynamically to boost engagement and satisfaction.
  • Data Studio: Leverage a secure environment to share high-quality data, enhancing the accuracy and effectiveness of targeted marketing efforts.
  • Pardot: Streamline lead management processes in a B2B context, enhancing engagement through personalized, automated marketing communications.

Salesforce Marketing Cloud Benefits

1. Data Management

Salesforce Marketing Cloud excels in managing vast amounts of data from multiple sources, enabling marketers to create a unified view of each customer. This comprehensive data management supports deep segmentation and personalization across all marketing channels.

Features such as Data Studio and the integrated Customer Data Platform help refine data usage, ensuring marketers can more effectively target their audiences based on behaviors, preferences, and previous interactions.

2. Integration Capability

One of Salesforce Marketing Cloud’s strongest benefits is its ability to integrate seamlessly with other Salesforce products (such as Sales Cloud and Service Cloud) and external systems. This integration extends Marketing Cloud’s functionality and reach, allowing for a cohesive experience across sales, customer service, and marketing.

Integration with Salesforce CRM, for instance, provides real-time data updates, which are important for maintaining accurate and timely marketing communications.

3. Third-party Apps

Through Salesforce AppExchange, Marketing Cloud users can access a wide array of third-party applications that can further enhance the platform’s capabilities. These apps can introduce additional features, specialized analytics tools, or niche solutions tailored to specific industry needs. This openness to third-party integrations allows businesses to customize and extend their marketing capabilities exactly as needed.

4. Artificial Intelligence

Marketing Cloud incorporates Salesforce’s AI technology, Einstein AI, to bring advanced analytics and machine learning to the marketing domain. Einstein AI enables features like predictive scoring, which forecasts future customer behaviors, and segmentation, which identifies distinct groups within the customer base for more targeted marketing. Einstein AI powers automated content and engagement suggestions, optimizing campaign performance without manual intervention.

How Does the Salesforce Platform Deliver Power to Take Marketing Further?

The Salesforce Ecosystem's Role in Enhancing Marketing Efforts

1. Comprehensive Customer View

The ecosystem facilitates a holistic view of the customer by integrating data from various touchpoints. This unified perspective enables marketers to understand customer behaviors, preferences, and interactions across multiple channels, leading to more informed marketing strategies.

2. Data-Driven Insights

Leveraging Salesforce’s analytical tools’ collective power, marketers can extract valuable insights from complex data sets. These insights drive smarter, data-driven decisions that can significantly enhance campaign performance.

3. Collaboration Across Departments

Salesforce promotes collaboration across different departments (sales, service, marketing, IT) by providing a shared platform for accessing and managing customer data. This cross-functional visibility helps ensure that marketing strategies are aligned with overall business objectives and customer service experiences.

Synergies Between Marketing Cloud and Other Salesforce Products

The integration of Marketing Cloud with other Salesforce products creates synergies that propel marketing efforts to new heights:

1. Sales Cloud Integration

By connecting Marketing Cloud with Sales Cloud, marketers gain real-time insights into the sales pipeline, customer feedback, and engagement history. This integration helps tailor marketing messages to align closely with sales strategies and customer needs, increasing conversion rates.

2. Service Cloud Coordination

Integrating Marketing Cloud with Service Cloud allows marketing campaigns to be informed by customer service interactions. This synergy ensures that marketing messages are sensitive to the customer’s current issues and sentiments, fostering a cohesive customer experience.

3. Customization Through Salesforce AppExchange

The Salesforce AppExchange offers numerous third-party apps that can be integrated with Marketing Cloud to extend its functionality. Whether enhancing email marketing capabilities, integrating advanced analytics, or adding niche marketing tools, AppExchange apps can be seamlessly combined with Marketing Cloud to meet specific marketing needs.

4. Platform and Tools

The underlying Salesforce Platform facilitates the development of custom apps and workflows that can further tailor Marketing Cloud to the specific requirements of a business. With tools like Salesforce’s Lightning Platform, businesses can create and integrate custom solutions that enhance Marketing Cloud’s capabilities.

List of Companies Using Salesforce Marketing Cloud

Salesforce Marketing Cloud is utilized by a diverse array of businesses across various industries, demonstrating its versatility and effectiveness in addressing unique marketing challenges.

Here are examples of successful implementations and how different industries benefit from using the Marketing Cloud:

Examples of Successful Implementations

  • Sony Music: Utilizes Salesforce Marketing Cloud to orchestrate digital marketing campaigns across the globe. By leveraging data-driven insights from Marketing Cloud, Sony Music can create personalized fan experiences and promote new releases and artist events.
  • Room & Board: A furniture company that uses Marketing Cloud to deliver personalized shopping experiences online. They can reach customers through targeted email campaigns and digital advertising with tailored messages that drive sales and customer loyalty.
  • American Red Cross: The organization employs Marketing Cloud to manage its communications with donors, volunteers, and recipients. Through email marketing and social media integration, it efficiently coordinates disaster response efforts and fundraising campaigns.

How Different Industries Benefit from Marketing Cloud

  • Retail: Retailers use Marketing Cloud to send personalized communications and offers to customers based on their shopping behaviors and preferences. Features like predictive analytics and customer journey mapping help retailers enhance customer engagement and increase sales.
  • Finance: Financial institutions implement Marketing Cloud to maintain consistent and secure communications with their clients. Automated messaging for regular updates, personalized financial advice, and real-time service alerts keep clients engaged and informed.
  • Healthcare: Healthcare providers leverage Marketing Cloud to improve patient engagement through personalized health tips, appointment reminders, and treatment updates. This ensures better patient outcomes and adherence to treatment plans.
  • Entertainment and Media: Companies in this sector use Marketing Cloud to manage ticket sales, event promotions, and fan engagement through targeted campaigns that cater to their audience’s preferences and past behaviors.
  • Non-Profit: Non-profit organizations utilize Marketing Cloud to enhance donor engagement and retention. Tailored fundraising campaigns and volunteer outreach efforts are managed efficiently, helping these organizations meet their goals.

Tutorial 8: Salesforce Security Model

In this tutorial, we will discuss the following topics:

    • Detailed Look at User Profiles and Permission Sets
    • Overview of Record-Level Security
    • Understanding Field-Level Security and the Audit Trail

Detailed Look at User Profiles and Permission Sets

Understanding User Profiles

User profiles in Salesforce are fundamental components of the platform’s security model, defining how users can interact with the CRM. Each profile sets permissions that determine what the user can view, edit, and execute within Salesforce, affecting data access and influencing overall system security.

Function of User Profiles

  • Access Control: Profiles control access to various tools and features within Salesforce, including which objects and fields users can see and which actions they can perform (e.g., read, create, edit, delete).
  • Page Layouts and Field-Level Security: Profiles determine the layout that users see and the fields they can access on that layout, helping ensure that sensitive data is only visible to authorized users.
  • Login Hours and IP Ranges: Admins can specify allowable login hours and restrict login attempts to certain IP ranges for each profile, enhancing security by limiting access to the system.

Customizing User Profiles

  • Edit Standard Profiles: While extensive changes to standard profiles (e.g., System Administrator, Standard User) are not recommended, they can be adjusted to better suit organizational needs.
  • Create Custom Profiles: It is often better to create custom profiles for different types of users within your organization. This practice allows for more tailored access control and minimizes potential security risks by ensuring users only have the permissions necessary for their roles.

Leveraging Permission Sets

Permission sets in Salesforce are additional layers of access control that can be assigned to users on top of their existing profiles. They are designed to extend users’ privileges without altering their base profile.

Difference Between Profiles and Permission Sets

  • Profiles: Every user must be assigned a profile; it is their primary access control mechanism. Profiles are comprehensive, affecting many aspects of a user’s access across Salesforce.
  • Permission Sets: These are optional and used to grant additional permissions above what the profile provides. They are useful for managing exceptions and special cases without creating numerous custom profiles.

Assigning Permission Sets for Additional Access

  • Identify the Need: Determine scenarios where users require more access than their profiles provide. Examples include granting report and dashboard creation rights or access to specific objects and fields.
  • Create and Configure: Create a new permission set in Salesforce by navigating to Setup, entering ‘Permission Sets’ in the Quick Find box, and selecting ‘New.’ Add specific permissions that align with the user’s additional needs.
  • Assign to Users: Once configured, assign the permission set to individual users as needed. This assignment does not change the user’s profile but supplements it with additional permissions.

Overview of Record-Level Security

Implementing Organization-Wide Defaults (OWD)

Organization-wide defaults (OWDs) are a fundamental aspect of Salesforce’s security model. They set the baseline level of access that users have to records they do not own.

  • Purpose of OWD Settings: OWDs are primarily used to lock down data access to the most restrictive level necessary for business operations. This setting ensures that additional access is granted intentionally through more targeted sharing mechanisms.
  • Configuring OWD for Different Objects:

To set up OWDs:

  1. Navigate to Setup, enter ‘Sharing Settings’ in the Quick Find box, then select it.
  2. Find the object you want to configure and set its default sharing model to either Private, Public Read Only, or Public Read/Write, depending on the required level of access.

Utilizing Roles and Role Hierarchies

Roles and role hierarchies in Salesforce manage and streamline access to records by grouping users into different levels of a hierarchy.

  • Defining Roles: Roles define a user’s position within the organization, influencing what records they can access based on the hierarchy. For example, a sales manager might have access to all records owned by sales reps in their team.
  • Influencing Record Visibility with Roles: Role hierarchies allow users higher in the hierarchy to access all records owned by users below them in the hierarchy, facilitating access control in line with organizational structure.

Applying Sharing Rules

Sharing rules extend record access beyond the baseline levels set by OWDs, allowing more nuanced data sharing among different user groups.

Types of Sharing Rules

  • There are two main types:
    1. Owner-based Sharing Rules: Allow record access based on who owns the record. For example, all records owned by a sales rep can be shared with their manager.
    2. Criteria-based Sharing Rules: Allow record access based on record values. For example, all opportunities with a value over $50,000 can be shared with senior sales personnel.

Creating Sharing Rules for Extended Access:

  • To create sharing rules:
    1. Go to Setup and enter ‘Sharing Settings’ in the Quick Find box, then navigate to the appropriate object.
    2. Click ‘New’ under either Owner-based or Criteria-based Sharing Rules.
    3. Define the rule by setting the criteria, specifying which users or roles it applies to, and setting the level of access (Read-Only or read-write).
    4. Save the rule to implement it.

Understanding Field-Level Security and the Audit Trail

Managing Field-Level Security

Field-Level Security (FLS) in Salesforce allows administrators to control access to specific fields even if a user has access to the object containing those fields. This means you can restrict sensitive data at a more granular level.

Restricting Field Access

  • To restrict access to certain fields:
    1. Navigate to Setup, enter ‘Field Accessibility’ in the Quick Find box, and select the object you need to configure.
    2. Click on ‘View by Profiles’, select a profile, and then adjust the accessibility for each field (Visible or Hidden).

Customizing Field Accessibility for Different Profiles

This feature enables you to set different levels of access for different user profiles. For instance, you might allow sales managers to see revenue figures while hiding this data from sales representatives. Customization ensures that users only access data pertinent to their roles, enhancing data security and compliance.

Utilizing the Audit Trail

The Audit Trail is a Salesforce feature that helps administrators track organizational changes, particularly in the configuration and setup area.

Monitoring Changes with the Audit Trail

The Audit Trail records who made what changes, when these changes were made, and the specific changes over the last six months. Commonly monitored changes include creating new users, changes to security settings, field-level security modifications, and records updates.

  • To view the Audit Trail, navigate to Setup, enter ‘View Setup Audit Trail’ in the Quick Find box, and click on it to see the recent setup changes.

Best Practices for Reviewing Audit Logs

  • Regular Reviews: Conduct regular reviews of your audit logs to monitor unauthorized changes or patterns that could indicate a security issue.
  • Set Alerts: Although Salesforce does not directly allow alerts for audit trail events, consider using third-party monitoring tools that can alert you to specified changes in real-time.
  • Maintain Records: Regularly download and archive your audit logs for compliance purposes and to extend the history beyond Salesforce’s six-month limit.

Tutorial 10: Basic Reporting and Dashboards

In this tutorial, we will discuss the following topics:

    • Creating Custom Reports in Salesforce
    • Building and Customizing Dashboards
    • Sharing Reports and Dashboards with Teams

Creating Custom Reports in Salesforce

Understanding Report Types

Standard vs. Custom Report Types

Salesforce provides various standard report types that cover common business needs across different objects. However, custom report types allow you to create reports from scratch or modify existing ones to include specific data fields and relationships not covered by standard reports. Understanding when to use each type is important for effective reporting.

Choosing the Right Report Format

Selecting the appropriate format—such as tabular, summary, matrix, or joined reports—depends on the complexity of the data and the insights needed. Tabular reports are the simplest, while matrix and joined reports offer multi-dimensional analysis.

Building a Custom Report

Step-by-Step Guide to Creating a Report

  1. Select Report Type: Choose a report type that best fits the data you need to analyze. For custom reports, define the objects and relationships.
  2. Choose Fields: Add fields from the available objects to the report. Consider which fields are necessary to provide the insights you need.
  3. Arrange Layout: Organize the fields and determine how they should be displayed. Decide on groupings and sort order.
  4. Preview and Adjust: Preview the report to check the layout and data accuracy. Make adjustments as needed to refine the data presentation.

Adding Filters and Groupings for Enhanced Insights

Incorporate filters to refine the data and focus on specific segments or conditions. Use groupings to summarize data around certain criteria, such as by date, department, or geographic location, which can highlight trends and patterns.

Customizing Reports

Modifying Columns and Summary Fields

Customize the columns in your report by adding or removing fields as needed. Adjust summary fields to include calculations like sums, averages, counts, or min/max statistics, which provide higher-level insights into data sets.

Applying Formulas and Conditional Formatting

Utilize formula fields to create custom calculations that are not directly available from the data. Apply conditional formatting rules to highlight key data points, such as high-performing areas or concerning trends, making the report more actionable and easier to analyze.

Building and Customizing Dashboards

Introduction to Dashboards

Dashboard Components and Layout

Salesforce dashboards are visual representations of reports and metrics, displaying data from various sources within Salesforce in a graphical format. Components like charts, gauges, tables, and metrics are used to create comprehensive dashboards that provide at-a-glance insights into business operations.

Understanding the Dashboard Builder

The Dashboard Builder is a tool within Salesforce that allows users to create and arrange dashboard components. It offers a drag-and-drop interface, making it easy to place components according to the desired layout and adjust their size and configuration to best fit the dashboard’s purpose.

Creating a Dashboard

Adding and Configuring Components

To create a dashboard:

  1. Choose a Source Report: Each dashboard component is based on a Salesforce report. Select the report that provides the data you want to visualize.
  2. Select the Component Type: Choose the type of visualization (e.g., chart, gauge, table) that best suits the data and your reporting needs.
  3. Configure Component Settings: Set properties such as the data to display, the summary operation (sum, average, etc.), and any specific formatting or filtering options.

Arranging Components for Optimal Viewing

Organize the components on the dashboard to ensure clarity and ease of understanding. Place related components near each other and use a logical order that reflects the flow of information. Consider the dashboard’s audience and their information priorities when deciding on the layout.

Sharing Reports and Dashboards with Teams

Report and Dashboard Folders

Managing Access with Folders

Salesforce uses folders to organize and manage access to reports and dashboards. By setting permissions on folders, you can control who can view, edit, or manage the reports and dashboards contained within them. This allows for tailored access that aligns with users’ roles and responsibilities within the organization.

Best Practices for Organizing Content

Organize reports and dashboards into folders based on department, function, or project to make them easy to locate and access. Use clear and consistent naming conventions for folders and their contents to avoid confusion and ensure all users can easily understand and find the needed resources.

Sharing Mechanisms

Manual Sharing vs. Scheduled Refreshes and Emails

  • Manual Sharing: Directly share individual reports and dashboards with other users, groups or via public links, providing immediate access as needed.
  • Scheduled Refreshes and Emails: Set up scheduled refreshes to automatically update the data in reports and dashboards at regular intervals. Combine this feature with email subscriptions to automatically send updated reports and dashboards to a list of subscribers, ensuring stakeholders receive timely updates without needing to manually check for them.

Collaboration Features within Salesforce

Utilize Salesforce Chatter to enhance collaboration around reports and dashboards. Users can post reports to Chatter feeds, attach dashboard snapshots, and discuss data-driven insights directly within the platform, fostering a collaborative environment for decision-making.

Security and Permissions

Controlling Access to Sensitive Data

It’s important to manage who has access to sensitive data within reports and dashboards. Implement strict permissions to restrict access to confidential information based on user roles and the principle of least privilege. Regular audits of access permissions help ensure compliance with data governance policies.

Understanding the Role of Permissions in Sharing

Permissions in Salesforce are managed at multiple levels, including system permissions, object permissions, field-level security, and folder-sharing settings. Understanding and correctly setting these permissions is key to ensuring users have appropriate access to reports and dashboards without exposing sensitive data.

Tutorial 11: Salesforce Mobile App

In this tutorial, we will discuss the following topics:

    • Getting Started with Salesforce Mobile App
    • Overview of Mobile Features and Functionality
    • Customizing the Mobile Experience

Getting Started with the Salesforce Mobile App

Downloading and Installing the App

Compatibility and Requirements

The Salesforce Mobile App is available for download on both iOS and Android platforms. Ensure your device meets Salesforce’s minimum system requirements, which include a suitable OS version and sufficient memory. Check Salesforce documentation for the latest compatibility details.

Initial Setup and Login

After downloading the App Store or Google Play app, open it and log in using your Salesforce credentials. Depending on your organization’s security settings, the initial login might require additional verification steps, such as two-factor authentication.

Navigating the Salesforce Mobile App

Understanding the User Interface

The Salesforce Mobile App is designed to provide a user-friendly experience. A navigation bar at the bottom of the screen allows access to key areas such as Home, Tasks, Notifications, and more. The interface is optimized for touch interactions, making navigating through various components and records easy.

Accessing Key Features and Functions

The app gives you access to a wide range of Salesforce functionalities, including:

  • View and Update Records: You can easily access, review, and update all your standard and custom objects and records.
  • Task Management: View and manage your tasks and events, allowing you to stay on top of your agenda directly from your mobile device.
  • Collaboration Tools: Use Chatter to stay connected with your team, share updates, and collaborate on projects no matter where you are.
  • Dashboards and Reports: Access your dashboards and reports to get insights into your data. Some visualization components might differ from the desktop version due to the mobile context.

Overview of Mobile Features and Functionality

Core Salesforce Features on Mobile

Working with Records and Data

The mobile app allows users to easily access, view, and edit Salesforce records, including everything from accounts and contacts to opportunities and custom objects. The mobile interface facilitates quick updates and data retrieval, which is crucial for sales teams and field service personnel who need access to real-time data while on the go.

Utilizing Chatter for Collaboration

Chatter is fully integrated into the Salesforce Mobile App, enabling users to communicate with colleagues, share files, and update project statuses from anywhere. This functionality supports a dynamic collaboration environment, allowing team members to stay connected and informed regardless of their location.

Mobile-Specific Features

Offline Access and Capabilities

One of the key features of the Salesforce Mobile App is its ability to function offline. Users can view, edit, and create records even without an internet connection. Changes are saved locally on the device and automatically synced with Salesforce once connectivity is restored, ensuring data integrity and continuous productivity.

Mobile Notifications and Alerts

The app provides real-time notifications and alerts directly to your mobile device. This feature ensures that users remain informed about important updates, such as task assignments, deal closings, or urgent messages from teammates. Custom notifications can be configured to match specific business processes or user preferences, enhancing responsiveness and engagement.

Customizing the Mobile Experience

Personalizing the Mobile Interface

Configuring Navigation and Layout

Tailor the Salesforce Mobile App’s navigation and layout to better suit the needs of your mobile workforce. Rearrange the navigation menu to prioritize the most frequently used features and customize the home screen to highlight key metrics and reports. This ensures that users have immediate access to the tools they need most.

Setting Up Mobile-Specific Views and Actions

Create mobile-specific views that provide streamlined access to data necessary for on-the-go tasks. Customize actions—such as quick call buttons or map integrations—that can significantly enhance efficiency for mobile users.

Administering Salesforce Mobile for Your Organization

Mobile Administration Settings

Utilize the Salesforce Admin Console to manage mobile-specific settings. This includes configuring which data and features are available on the mobile app, setting data synchronization policies for offline use, and managing app updates to ensure all users have the latest functionalities and security patches.

Deploying Mobile-Specific Configurations and Policies

Establish policies that address mobile usage scenarios specific to your organization. This could involve setting up mobile-specific workflows, defining data entry standards for mobile devices, and deploying mobile security policies that protect sensitive data without impeding user productivity.

Best Practices for Mobile Usage

Optimizing Performance and User Adoption

Focus on enhancing the performance of the Salesforce Mobile App by optimizing data management practices, such as limiting the synchronization of large files or complex data sets to essential users only.

Encourage user adoption by providing tailored training that highlights the benefits and capabilities of the mobile app, ensuring users are comfortable and proficient with the mobile tools at their disposal.

Security Considerations for Mobile Users

Security is paramount, especially for mobile devices that may access corporate data in insecure environments. Implement strong authentication measures, use encryption for data at rest and in transit, and ensure device management policies like remote wipe capabilities are in place.

Educate users about best practices for securing their devices, such as using strong passwords, recognizing phishing attempts, and immediately reporting lost or stolen devices.